

Creating a birthday email as a campaign type
The best way to create a birthday email is with an automation that starts on a date in your list, see Date in list as starting moment. You can also still create a birthday email as a campaign type, which is the older method.
You set up the campaign once and then leave it running. Every subscriber who has a birthday will receive the email at the chosen time: on the birthday itself or a few days before.
First make sure you have dates of birth
Without a date of birth, Laposta does not know whose birthday it is. Subscribers for whom this field is empty will therefore not receive this email.
If the dates of birth are not yet recorded for your subscribers, add them to your list first. To do this, create an extra field with the field type ‘date’. It is recommended to name the field ‘Date of birth’ and make it required. If your field has a different name, that is not a problem: in step 2 of the campaign, you select which field contains the date of birth for each list yourself.
If multiple subscribers share one email address, for example family members at a school or club, Laposta deduplicates those email addresses. There are two ways to still send each of them their own birthday email.
Setting up the campaign
You do not start a birthday campaign with the regular ‘Create new campaign’ button, but via a different campaign type. Go to Campaigns → Browse and when starting a new campaign, click the link ‘Choose a different campaign type’. Choose the option ‘Birthday’ (to create a birthday email) and click ‘Start’.
After that, you go through the steps. The difference compared to a regular newsletter lies in steps 2, 3, 4 and 6.
Enter the basic details
Record details such as the sender address, sender name, subject and previewtext, just as with a regular campaign. See also Step 1: Entering the basic details.
Congratulate the birthday person straight away in the subject or previewtext, using personalisation in the subject.
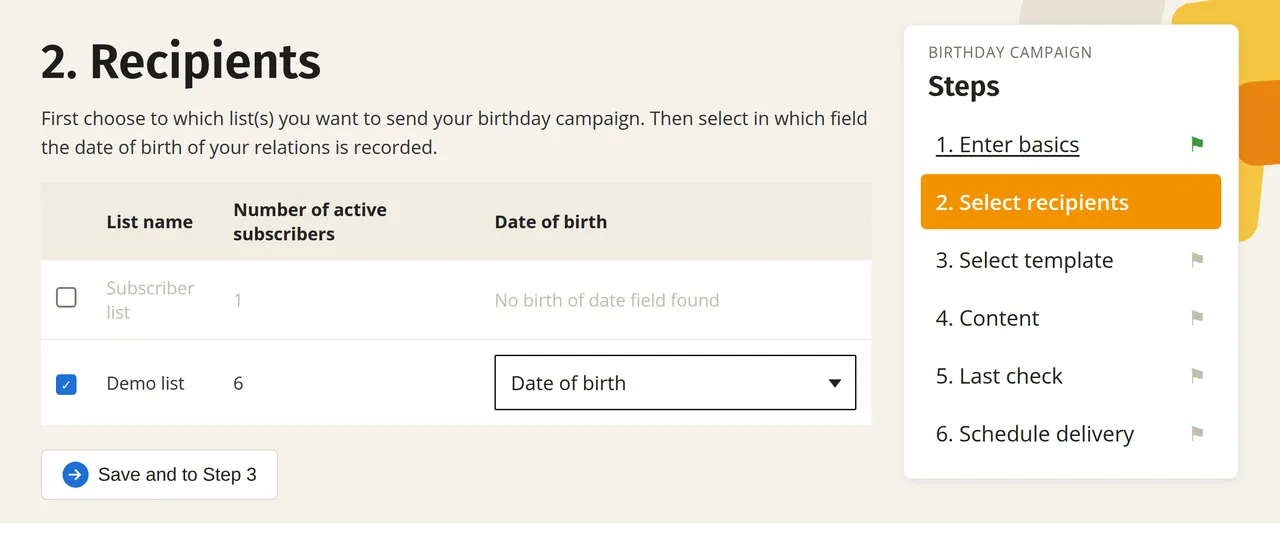
Select recipients and the date of birth field
Tick the lists and segments to which you want to send the birthday email. For each list, indicate which field contains the date of birth of your subscribers. See also Step 2: Selecting recipients.
Select a template
Choose a template for your email. If you have already created a template for birthday emails yourself, it will appear at the top under ‘Saved templates’. Otherwise, choose a ready-made template, which you can customise further in terms of structure and design in step 4. Click ‘Preview’ below a template to view it first. Click ‘To Step 4’ in the yellow box to continue. See also Step 3: Choosing a template.
Fill in the template
Put your birthday email together in the drag & drop editor. You handle two things differently here compared to a regular newsletter:
- Keep the email short. A congratulatory message and one large image are usually enough, and you can edit that image directly in the editor. A gift or extra discount makes the email more valuable to your subscriber.
- Use the birthday variables. Alongside the regular subscriber variables (Variables), there are seven extra variables that allow you to mention, for example, the age or the day of the birthday. See: Birthday variables for age and date.
All options for this step, including the preview and the testmail, can be found in Step 4: Filling the template. For the display on a telephone, see Formatting for desktop or mobile display.
Last check
Check your birthday email, the entered basic details and the selected recipients. See also Step 5: Final check.
Schedule delivery
First choose the start date of the campaign and then the time at which a birthday person receives the email. Here lies the extra choice compared to a regular campaign: you choose whether the email is sent on the birthday itself or a number of days before. Click ‘Save date and time’ to place the campaign in the scheduler and activate it.
If you want to pause or edit the campaign later, you can stop it via the campaign overview.